


If you are planning to run an Ubuntu 16.04 server, this tutorial will guide you through the initial setup and modification of configuration files that are necessary for basic security and functionality of your server. This guide assumes that you are hosting your server from a VPS or cloud provider like DigitalOcean and Vultr.
Procedures:
- Login and Update
- Install CSF
- Create Non-Root User
- Generate SSH Key Pairs
- Disable Root Login and Password Authentication
Step 1 – Login and Update
When a server is initially deployed, you would receive an automated email from your host containing the root credentials that you could use to access your box. Along with the credentials, you would also see the public IP address assigned to your server. This information is needed to access your server.
How you access your system depends on what OS you are using. Below are guides for macOS (which can also be followed for Unix-based OSes) and Windows.
macOS
You can use the default Terminal App that is pre-installed on Apple laptops and computers. From your desktop, click Go > Utilities > Terminal. Here is the command to connect to your newly deployed Ubuntu server:
|
1 |
localhost~$ ssh root@SERVER_PUBLIC_IP_ADDRESS |
Replace SERVER_PUBLIC_IP_ADDRESS with the one assigned to you by your host. This can be found in the server deployment email or in your host’s control panel.
Windows
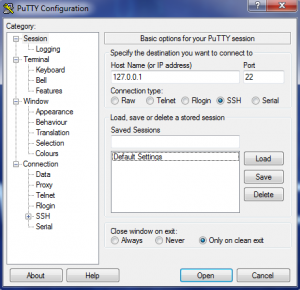 Windows does not have a native SSH client therefore, we would need to download a third-party client called PuTTY.
To login, just fill up the following fields with your server’s information:
- IP Address: SERVER_PUBLIC_IP_ADDRESS
- Port: 22
- Connection Type: SSH
Click connect after you input the correct information.
Once you are in your server, the first thing I suggest is to edit your ~/.profile and append the following to optimize your command logging and beautify your shell.
Hint: Use vim ~/.profile command
|
1 2 3 4 5 6 7 |
PS1='${debian_chroot:+($debian_chroot)}\[\e[1;31m\]\u@\h\[\e[1;34m\]:\[\e[00m\]\w\$ ' HISTCONTROL=ignoreboth HISTTIMEFORMAT='%F %T ' export PS1 export HISTCONTROL export HISTTIMEFORMAT |
I always set the root’s prompt to red so that I can easily identify whether I am logged in as root or as a non-root user.
Save and close the file by issuing :x and enter.
Next, update the server and reconfigure the clock to your preferred timezone.
|
1 2 |
root@server~$ apt-get update && apt-get -y upgrade && apt-get -y dist-upgrade root@server~$ dpkg-reconfigure tzdata |
Step 2 – Install CSF
Config Server Firewall (CSF) is a suite of scripts designed for Linux distributions which provides an intuitive interface to easily manage your firewall and security configurations. The following commands would download and install the latest CSF into your server.
|
1 2 3 4 5 |
root@server~$ cd /usr/src root@server~$ wget https://download.configserver.com/csf.tgz root@server~$ tar zxvf csf.tgz root@server~$ cd csf root@server~$ sh install.sh |
Once installed, adjust the configuration file to enable it and provide basic security that you need: vim ~/etc/csf/csf.conf. Edit the following variables:
|
1 2 3 4 5 6 7 8 9 10 11 12 13 14 15 16 17 18 19 20 21 22 23 |
TESTING = “0” RESTRICT_SYSLOG = “3” SYSLOG_CHECK = “3600” LF_POP3D = “1” LF_IMAPD = “1” UI = “1” UI_USER = “UI_USERNAME” UI_PASS = “UI_PASSWORD” UI_RETRY = “3” # Add your own SSHD_PORT in the following variables: TCP_IN = "20,21,22,25,53,80,110,143,443,465,587,993,995,SSHD_PORT" TCP6_IN = "20,21,22,25,53,80,110,143,443,465,587,993,995,SSHD_PORT" # Set Ubuntu Log Files SU_LOG = "/var/log/syslog" FTPD_LOG = "/var/log/syslog" IPTABLES_LOG = "/var/log/syslog" SUHOSIN_LOG = "/var/log/syslog" BIND_LOG = "/var/log/syslog" SYSLOG_LOG = "/var/log/syslog" SSHD_LOG = “/var/log/auth.log” SMTPAUTH_LOG = “/var/log/auth.log” |
Set your own UI_USERNAME, UI_PASSWORD, and SSHD_PORT.
CSF includes a beautiful UI that you can use and access via your web browser to check or adjust your server’s security-related activities. Enable it using the following;
|
1 2 3 4 5 |
root@server~$ apt-get install libwww-perl sendmail root@server~$ echo $SSH_CLIENT | awk '{print $1}' >> /etc/csf/ui/ui.allow root@server~$ systemctl stop sendmail && systemctl disable sendmail root@server~$ systemctl restart lfd root@server~$ csf -r |
Note: You need to add your Public IP to the /etc/csf/ui/ui.allow file. Refer to the 2nd line.
Step 3 – Create Non-Root User
At this stage, you are logged in as the all-powerful root user. It is advisable that you create an alternative user with a limited scope of access.
|
1 2 |
root@server~$ adduser USERNAME root@server~$ gpasswd -a USERNAME sudo |
Replace USERNAME with your username of choice.
Adding the new user in the sudo group grants it administrative privileges. The sudo group allows its members to execute commands as root when needed by prepending sudo in any command you want to run with elevated privileges. Example: sudo systemctl restart sshd
At this moment, you are still logged in as root. It’s time to switch to the new non-user you have created:
|
1 |
root@server~$ su - USERNAME |
Once you have switched to your new user, edit its ~/.profile as we did with the root account and append the following:
|
1 2 3 4 5 |
HISTCONTROL=ignoreboth HISTTIMEFORMAT='%F %T ' export HISTCONTROL export HISTTIMEFORMAT |
Source the file after saving it to apply the modifications to the current session.
|
1 |
USERNAME@server~$ source ~/.profile |


